# React
# JSX의 기본 규칙
# 컴포넌트 개념
# 스프린트 과제와 함께 알아봅시다.
// 기본 준비 코드 : 가짜 데이터들의 모음인 dummy data 를 App.js에서 사용할 수 있게 import.
import React from 'react';
import './App.css';
import './global-style.css';
import { dummyTweets } from './static/dummyData';
// 전체 페이지인 메인 컴포넌트 구현 : App
//App 컴포넌트 안에 <Sidebar/> 컴포넌트와 <Features/> 컴포넌트가 들어가서 CSS에서 자유롭게 UI 구조 변경 및 설정 가능
const App = () => {
  return (
    <div className="App">
      <main>
        <Sidebar/>
        <Features />
      </main>
    </div>
  );
};
// Sidebar 에 이모티콘 추가
const Sidebar = () => {
  return (
    <section className="sidebar">
      <i className ="far fa-brands fa-twitter"></i>
    </section>
  );
};
// 트위터 메세지, 총 메세지 개수, Footer 의 UI 제어 및 관리를 위한 Features 컴포넌트 생성
const Features = () => {
  return (
    <section className="features">
      <div className="tweetForm__container">
        <div className="tweetForm__wrapper">
          <div className="tweetForm__profile"></div>
          <Counter />
        </div>
      </div>
      <Tweets />
      <Footer/>
    </section>
  );
};
* 트위터 메세지 컴포넌트 : <Tweets/>
* 총 메세지 개수 컴포넌트 : <Counter/>
* Footer 컴포넌트 : <Footer/>
// Feature 부분의 UI 구조는 위에서부터 아래로 [1] 총 메세지 개수 컴포넌트 [2] 트위터 메세지 [3] Footer 로 구현을 할 계획
// 총 메세지 개수 컴포넌트 : Counter
// dummy data 에서 총 메세지 개수 구하기
const Counter = () => {
  return (
    <div className="tweetForm__input">
      <div className="tweetForm__inputWrapper">
        <div className="tweetForm__count" role="status">
          {'total:' + dummyTweets.length}
        </div>
      </div>
    </div>
  );
};

// total : {dummyTweets.length} _이렇게 작성해도 됩니다.
* 더미데이터는 배열 안에 객체의 형태들로 저장 되어 있어서 .length 로 총 개수를 파악할 수 있음.
// 트위터 메세지 컴포넌트 : Tweets
// map 을 통해 더미데이트들의 객체들 안의 값(데이터)에 접근
// 작성자 이름 [ tweet.username ] , 작성 날짜 [ tweet.createdAt ] , 작성 메세지 [ tweet.content ] , 작성자 사진 [ tweet.pircure ]
// [ tweet.username ] 중 ' parkhacker' 는 보라색으로 배경 색 넣어주기
const Tweets = () => {
  return (
    <ul className="tweets">
      {dummyTweets.map((tweet) => {
        // 여기다가 JS 문법 작성
        const isParkHacker = tweet.username === 'parkhacker'
        const tweetUserNameClass = isParkHacker
          ? 'tweet__username tweet__username--purple'
          : 'tweet__username';
        return (
          <li className="tweet" key={tweet.id}>
            <div className="tweet__profile">
              <img src = {tweet.picture}></img>
            </div>
            <div className="tweet__content">
              <div className="tweet__userInfo">
                <span className = {tweetUserNameClass}>{tweet.username}</span>
                <span className="tweet__createdAt">{tweet.createdAt}</span>
              </div>
              <span className ="tweet__message">{tweet.content}</span>
            </div>
          </li>
        );
      })}
    </ul>
  );
};
// Footer 컴포넌트 구현 : Footer
// Footer 컴포넌트 안에 semantic element 인 footer 요소 포함 되어 있어야 함.
const Footer = () => {
  return (
    <div>
      <img id="logo" src={`${process.env.PUBLIC_URL}/codestates-logo.png`} />
      <footer>Copyright @ 2022 Code States</footer>
    </div>
  );
};
* Copyright @ 2022 Code States 를 <footer></footer>로 감싸주어야 합니다.
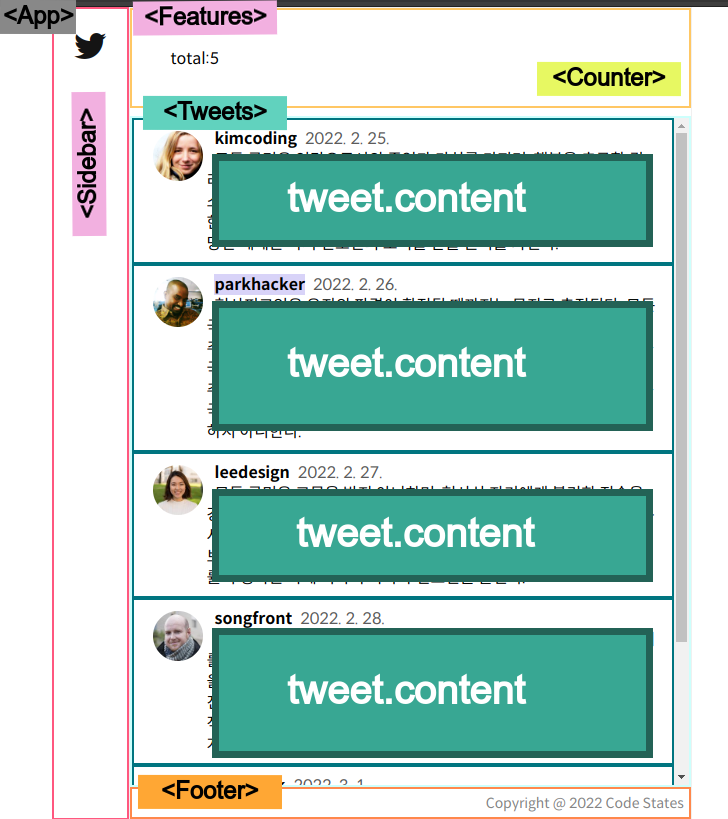
위의 내용들을 UI 구조적으로 보면 다음 사진과 같습니다.
'일상의 기록 > 🌷DAILY 회고록 : 코드스테이츠' 카테고리의 다른 글
| [230324] React : props로 인자를 하위 컴포넌트에 전달 하기 (0) | 2023.03.24 |
|---|---|
| [230323] React : SPA 와 Router (0) | 2023.03.23 |
| [230321] Promise 안의 object 안의 data/객체 접근하기 (feat..fetch) (0) | 2023.03.21 |
| [230320] 비동기 : promise + async/await * * (0) | 2023.03.20 |
| [230320] 문자열 뒤집기 (0) | 2023.03.20 |